


Telnet is an old Internet protocol used on the Internet or local area networks to provide a bidirectional interactive communications facility.Telnet is a program used to remote computers using the Telnet protocol. This protocol is not so popular now as it was in the old days of Windows. May be this is why it is not installed in Windows 7, by default. If you want to install Telnet in Windows 7, follow below steps.
How to Enable Telnet
1. Press Windows logo key + R .
2. In the Run dialog, type ” OptionalFeatures.exe ” and press Enter.
3. Scroll down in the Windows Features window and mark Telnet Client as shown.
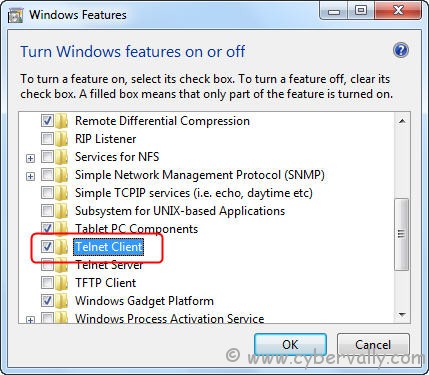
4. Click OK to start the installation.
5. After the installation check it on Run dialog box to start the Telnet Client.


Thank you was searching for the same.
Thanks you for this post. I found a similar one here:
http://cyberst0rm.blogspot.com/2011/07/how-to-install-telnet-client-in-windows.html